
Accessories · WDT tools
The Best WDT Tools for Espresso
The cheapest thing on this site that will visibly change your shot. It is a handle with needles in it, it costs less than a bag of good beans, and it fixes the one problem most home setups actually have.
The short answer
Buy the Normcore WDT Distribution Tool V2.1: its 0.23 mm needles are fine enough to pass through the bed without dragging it, it ships with a magnetic stand and 16 spare needles, and it is an inexpensive accessory. Choose the KNODOS instead if you want both a 0.4 mm and a 0.25 mm needle set in one box.
We earn a commission if you buy through a link on this page. It costs you nothing extra and it does not change what we recommend. Full disclosure.
Key takeaways
- A WDT tool is used on DRY grounds, before you tamp. It is not a tamper and it does not replace one.
- The problem it solves is clumps and voids, not an uneven surface. A leveler flattens the top; a WDT tool fixes the inside of the bed.
- Needle gauge is the spec that matters. Thinner needles (0.2-0.25 mm) pass through the bed; thicker ones (0.4 mm) move it.
- It is the cheapest meaningful accessory in espresso, and the one most likely to stop a shot from gushing down one side of the basket.
- No manufacturer publishes controlled extraction data for any of these tools, and neither do we. What follows is sourced from listings and from how the technique is documented.
What a WDT tool actually does
Grind coffee fine enough for espresso and it does not land in the basket as a tidy, even bed. It lands as a pile with clumps in it. Coffee is slightly oily and slightly static, so fine particles stick to each other on the way out of the grinder, and a clump is a lump of coffee that water has to get through while the loose grounds beside it offer almost no resistance at all.
Water does what water always does: it takes the easy route. It funnels around the dense clump, rushes through the loose patch next to it, and you get a shot that is simultaneously over-extracted in one place and barely extracted in another. That is channeling, and if you have ever watched a shot sprint out of one side of a bottomless portafilter while the other side does nothing, you have watched it happen.
The Weiss Distribution Technique is the fix, and it is almost insultingly simple: before you tamp, stir the dry grounds with something thin enough to pass between the particles. The clumps break up, the voids fill in, and the bed becomes uniform all the way down rather than just flat on top. A WDT tool is a handle with several fine needles in it, and that is the entire product.
The technique is not marketing. It is named after John Weiss, a retired researcher who described it on the Home-Barista forum in December 2005 after tracing his inconsistent shots to uneven distribution — he started with a dissecting needle from a college kit, because nobody sold a tool for this yet. Daily Coffee News interviewed him about it in 2022. The commercial tools below are all descendants of that dissecting needle.
What separates a good one from a bad one
There is very little engineering in this product, which is exactly why it is worth knowing the three things that differ. Everything else — the wood, the knurling, the color — is jewelry.
1. Needle gauge, which is the only spec that really matters
Needles sold on these tools run roughly from 0.2 mm to 0.4 mm. The thinner the needle, the more it behaves like it is not there: it slides between particles, breaks the clump, and leaves the surrounding bed where it was. A 0.4 mm needle is stiff and it pushes coffee around, which is fine if your technique is gentle and less fine if it is not. Thin needles are better at the actual job; thick needles are harder to bend and more forgiving of being shoved into a basket. If you are buying one tool and you are new to this, the fine set is the one to use and the thick set is the one to keep in the drawer.
2. Prong count versus your basket size
More prongs mean fewer passes. A single-needle tool works — it is what the technique was invented with — but it takes real patience to cover a 58 mm bed one needle-width at a time. Eight to twelve prongs on a rake covers a basket in a handful of slow circles. Beyond about twelve the tool starts behaving like a stiff comb and dragging the bed rather than passing through it.
3. A stand, which sounds like a gimmick and is not
The needles get coffee on them, and when you put the tool down on the counter the needles are what it rests on. Three of the four picks below include a magnetic stand that holds the tool needles-up. It costs the manufacturer almost nothing and it is the difference between a tool that stays clean and one you stop using.
What does not matter
Needle length is adjustable on some tools, and the adjustment range is usually sold as a feature for "different dose sizes." In practice you set it once, to roughly the depth of your bed, and never touch it again. Handle material does not affect the coffee. Neither does whether the needles are 304 or 316 stainless, at the temperatures and timescales involved here.
All four WDT tools, compared
Every pick on this page in one view, with the live Amazon price and stock on each row. Specs are the figures the maker or the listing publishes — nothing measured or scored by us. Prices are read from Amazon's API and were last checked October 19, 2026; where we have no verified price, the row says so rather than show you an old number.
| # | WDT tool | Why it is here | Price & availability |
|---|---|---|---|
| 1 | 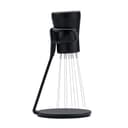 #1 Normcore WDT Distribution Tool V2.1 with Stand Best overall · Mid 8 prongs · 0.23 mm needles · magnetic stand · 16 spare needles The finest needles of the four, and spares in the box. | The finest needles of the four, and spares in the box.8 prongs · 0.23 mm needles · magnetic stand · 16 spare needles | $23.69In stock, checked October 19, 2026 Check Price on Amazon |
| 2 | 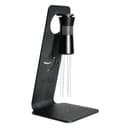 #2 KNODOS Magnetic WDT Tool with Stand Best for two baskets · Mid 0.4 mm and 0.25 mm needle sets · stated fit 51 / 54 / 58 mm Two needle gauges in one box, and it names the baskets it fits. | Two needle gauges in one box, and it names the baskets it fits.0.4 mm and 0.25 mm needle sets · stated fit 51 / 54 / 58 mm | $19.99In stock, checked October 19, 2026 Check Price on Amazon |
| 3 | 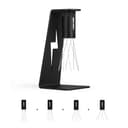 Best built · Mid 0.4 mm needles · adjustable needle depth · magnetic stand · 8 + 6 spares The nicest object of the four, with the stiffer needle gauge. | The nicest object of the four, with the stiffer needle gauge.0.4 mm needles · adjustable needle depth · magnetic stand · 8 + 6 spares | $25.99In stock, checked October 19, 2026 Check Price on Amazon |
| 4 | 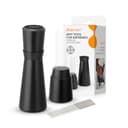 Cheapest worth buying · Entry 10 × 0.4 mm needles · aluminum handle · stand · 10 spare needles Does the job for the least money, with spares included. | Does the job for the least money, with spares included.10 × 0.4 mm needles · aluminum handle · stand · 10 spare needles | $13.99In stock, checked October 19, 2026 Check Price on Amazon |
The four picks
Normcore WDT Distribution Tool V2.1 — the one to buy
Normcore is the brand that turned most of these home-espresso accessories from forum projects into products you can just buy, and the V2.1 is their mainstream WDT rake. The listing specifies eight prongs at 0.23 mm, a magnetic stand, and 16 extra needles in the box. That needle gauge is the reason it is the pick: at 0.23 mm the needles genuinely pass through a fine espresso bed, which is the whole point of the technique, and eight of them cover a 54 mm basket in two or three slow circles.
The spare needles are not padding. Bending a needle is the normal failure mode for these tools — it happens the first time you push straight down into a tightly dosed basket instead of stirring — and a rake with one bent prong drags a line through the bed every pass. Sixteen spares means that is a 30-second repair rather than a new purchase.
The honest cons. Normcore does not publish a needle-length figure for this version anywhere we could find, so if you are dosing unusually deep baskets you are buying on faith. Fine needles are also the easiest to bend, and this is the finest gauge of the four — it rewards a gentle hand and punishes an impatient one. And it is a single needle set: if you decide you want something stiffer, you are buying another tool.
KNODOS Magnetic WDT Tool — the one with both needle sets
KNODOS make the calibrated tamper we point beginners at on the tampers page, and this is the same idea applied to distribution: a tool that removes a decision rather than one that assumes you have already made it. The listing includes both a 0.4 mm and a 0.25 mm needle set, a magnetic stand, and a stated fit for 51, 54 and 58 mm portafilters.
Two needle sets in one box is genuinely useful if you are still working out your routine. Start with the 0.4 mm set, which is stiff and hard to bend while you learn not to stab, then move to the 0.25 mm set once stirring has become a habit. It is also the only pick of the four whose listing names the basket diameters it fits, which is worth something on a site where half the readers own a 54 mm Breville and half own a 58 mm machine — see 54 mm vs 58 mm if you are not sure which you have.
The honest cons. Swapping needle sets is fiddly and you will probably do it once. KNODOS does not publish a prong count for either set, so you cannot compare coverage against the Normcore before it arrives. And two sets at this price means the per-set build is not going to feel like the MHW below.
MHW-3BOMBER T6126 — the nicest object
MHW-3BOMBER build the kind of accessory people put on the counter rather than in a drawer, and the T6126 listing specifies 0.4 mm stainless needles, an adjustable needle range, a magnetic stand, and eight needles plus six spares. The adjustable depth is the one feature here that is more than cosmetic: if you dose 18 g in a shallow 54 mm basket and 20 g in a deeper 58 mm one, you can set the needles to clear the basket floor in each.
The honest cons. 0.4 mm is the stiff end of the range, so this tool moves the bed more than the Normcore does and asks for a lighter touch to compensate — the opposite of what its solid feel suggests. Fourteen needles total is fewer spares than either of the picks above. And you are paying a premium over the Aieve for materials, not for a better result in the cup; if you want the best shot per dollar, buy the Normcore and spend the difference on a better grinder.
Aieve WDT Tool — the cheapest one worth owning
The listing specifies ten 0.4 mm stainless needles, an aluminum alloy handle, a stand, and ten spare needles. That is the complete useful feature set of this product category at the bottom of its price range, and if the question is "is a WDT tool worth trying at all," this is the cheapest honest way to find out. Ten prongs is the most coverage of the four picks, which on a 58 mm basket is a real convenience.
The honest cons. 0.4 mm needles, no choice of gauge, and no published needle length. Ten stiff prongs at once is also the combination most likely to drag rather than pass through, so this is the pick that most rewards slow, patient stirring. Aieve is a generalist kitchen-accessory brand rather than an espresso specialist, so there is no espresso-specific support behind it if a part fails.
The two tools people buy by mistake
Both of these are real, useful products. Neither is a WDT tool, and buying one expecting it to fix channeling is the most common mistake in this corner of the accessory market. We are listing them because the search results that brought you here almost certainly mixed them in.
A leveler / distributor — flattens the top, not the inside
A leveler is a weighted disc with angled blades that you rest on the dosed basket and twist. The listing describes it as an espresso leveler for 58 mm portafilters with adjustable depth and a stainless steel base. It gives you a flat, lightly compressed surface before tamping, and it makes the puck look professional.
What it cannot do is reach a clump two thirds of the way down the bed, because it never goes below the surface. Use one after WDT if you like the consistency it adds. Using one insteadof WDT is treating the symptom you can see rather than the one that ruins the shot. Also note the size: this is a 58.5 mm tool and it will not fit a Breville's 54 mm basket.
A dosing funnel — stops the mess, does nothing to the bed
The listing describes an 18 mm anodized aluminum ring with nine magnetized steel inserts that clamps onto a 58 mm portafilter. It raises the basket wall so grounds land in the basket instead of on your counter, and it gives you somewhere to put the WDT needles without spraying coffee everywhere.
That is the honest pitch: it is a convenience item that makes WDT less messy, and it is the one accessory on this page that genuinely pairs with the tools above rather than competing with them. It will not change a single thing about your extraction. Buy it second, if at all.
How to actually use it
The tool is trivial; the technique has one rule that people break. Stir, do not stab.
- Grind straight into the basket. If your grinder clumps badly, that is itself worth fixing — a single-dose grinder or a gentler grinder produces less of this problem in the first place.
- Fit a dosing funnel if you have one, or accept that some coffee is going on the counter.
- Lower the needles into the bed and move them in slow circles and figure-eights for ten to fifteen seconds, working from the edge toward the middle. You are looking to feel the resistance go even, not to reach a count.
- Tap the basket once on the counter to settle the surface, then tamp level. Level matters far more than hard.
- Pull the shot and watch it. If you own a bottomless portafilter, this is where you will actually see whether it worked — a single even stream instead of two sprays fighting each other.
If the shot still runs fast and tastes thin, WDT was not your problem — read why your espresso pours too fast and then how to dial in espresso, in that order. A WDT tool removes one variable. It does not grind your coffee correctly for you.
What the evidence does and does not show
We want to be straight about this, because the accessory market is not. There is no controlled, published study that measures the effect of a WDT tool on extraction yield. Not from Normcore, not from MHW-3BOMBER, not from anyone. What exists is twenty years of consistent reporting from home users that stirring the bed reduces channeling, plus the mechanical argument — a clump is a dense obstacle in a bed that is supposed to be uniform, and water routes around obstacles — which is straightforward enough that it does not need a study to be plausible.
Barista Hustle notes that WDT is not a widely adopted practice behind fast, high-volume commercial bars, and that is worth knowing rather than hiding: a café pulling 400 shots a shift does not have fifteen seconds per basket to spare. That is a throughput constraint, not a verdict on whether it works. You are not a café.
So the claim we will make is the narrow one. A WDT tool is cheap, it is the standard answer to clumping and channeling among people who make espresso at home, and the mechanism is easy to understand. We have not instrumented it ourselves and we are not going to invent a percentage.
What we know, and how we know it
What we did
- Took the specs from the manufacturer's own documentation. Not from a retailer listing, and not from another blog.
- Priced it from Amazon's API, with the date we checked shown next to the number. If that price is more than 48 hours old, this page stops showing a number at all rather than show you a wrong one.
- Formed a verdict from those specs, the price, and what owners publicly report.
Where these figures came from
Needle gauges, prong counts, spare-needle counts and stated basket fits are read off the live Amazon listing for each tool, checked on 2026-10-19 — none of these accessories is in our machine-and-grinder spec database, and none of these makers publishes a spec sheet of the kind Breville or Baratza does. Where a listing does not state a figure (needle length, most prong counts), we say so rather than fill it in. The history of the technique comes from Daily Coffee News' 2022 interview with John Weiss.
What we did not do
We do not run a lab. We have not pulled thousands of shots on this machine, and we are not going to pretend otherwise. We have not used this unit ourselves. Everything above is sourced research, and it is labeled as such. Where we have used a machine, we say so and show it.
How we're paid
If you buy through a link on this page, we earn a commission. It costs you nothing extra and it does not change what we recommend — we link to the better option for the buyer even when it earns us less. See how we review and our full disclosure.
The verdict
Buy the Normcore V2.1. The 0.23 mm needles do the job the technique was invented for, the magnetic stand keeps it usable, and the 16 spare needles cover the one thing that goes wrong with these tools. If you would rather hedge on needle gauge, the KNODOS gives you both a stiff set and a fine set in one box and tells you which baskets it fits. The MHW-3BOMBER is the one to buy if you want an object you enjoy picking up, and the Aieve is the one to buy if you want to test the idea for the smallest possible amount of money.
And the honest framing for all four: this is a cheap accessory that removes a real and common failure. It is not a substitute for a grinder that produces an even grind in the first place — that is still the single biggest lever you have. If you are buying one thing today and you do not already own a scale, buy the scale instead. If you own the scale, this is the next twenty-something dollars worth spending. The rest of the short list is on the accessories hub, and the companion to this page is puck screens — which sit on the other side of the puck and are a much weaker proposition.
Frequently asked questions
What does WDT stand for?
Weiss Distribution Technique, after John Weiss, a retired researcher who described it on the Home-Barista forum in December 2005. He had traced his inconsistent shots to uneven grounds distribution and started stirring the dry coffee with a dissecting needle from an old college kit. Every commercial WDT tool sold today is a descendant of that needle.
Does a WDT tool actually make better espresso?
It reliably reduces clumping and channeling, which is the most common reason a home shot gushes out of one side of the basket. What does not exist is a controlled, published study measuring the effect on extraction yield — not from any of these manufacturers, and not from us. The mechanism is easy to understand and the tool is cheap, so it is worth trying; we are not going to quote a percentage improvement nobody has measured.
What needle thickness is best for a WDT tool?
Finer is better at the actual job. Needles around 0.2-0.25 mm pass between coffee particles and break clumps without dragging the whole bed around; 0.4 mm needles are stiffer and move more coffee. The trade-off is durability — thin needles bend if you push straight down instead of stirring. If you are new to it, a 0.4 mm set is more forgiving while you build the habit.
Is a WDT tool the same as a distribution tool or a leveler?
No, and this is the most common mix-up in the category. A WDT tool has fine needles and works inside the dry coffee bed to break up clumps. A leveler or distributor is a weighted disc with blades that flattens and lightly compresses the top of the bed only. A tamper compresses the whole bed. Only the WDT tool reaches a clump halfway down the basket, which is where the problem actually is.
Do I need a WDT tool if I have a Breville Barista Express?
It is one of the better upgrades for that machine, because the Barista Express grinds straight into the portafilter and that is exactly the setup clumping shows up in. Buy a tool whose needles clear a 54 mm basket; the KNODOS pick above states 51, 54 and 58 mm fit. Do not buy a 58.5 mm leveler for it — that will not fit at all.
Can I just use a paperclip or a toothpick instead?
Yes, and that is genuinely how a lot of people start — the technique was invented with a single dissecting needle, so a straightened paperclip or a cocktail stick does the job. The commercial tools buy you coverage (eight to twelve needles instead of one), a stand that keeps coffee off your counter, and spare needles. If you want to know whether WDT helps your setup before spending anything, the paperclip test is a legitimate first step.
Do you WDT before or after tamping?
Before, always, and on dry grounds. The point is to make the loose bed uniform so that tamping compresses something even. Stirring a tamped puck would just destroy it. The order is: grind into the basket, WDT, settle, tamp level, pull.
Does a WDT tool help a pressurized basket?
Much less. A pressurized (dual-wall) basket creates its own back-pressure through a single small hole, which is exactly what makes it forgiving of bad distribution in the first place. If you are still on the pressurized basket that came with your machine, the upgrade that changes your shot is the non-pressurized basket, not the WDT tool — and then the WDT tool starts to matter.
Sources
Specs come from the manufacturer's own documentation. Prices come from Amazon's API. Where a claim comes from what owners report, we link the thread and say so.
- Daily Coffee News — "What is WDT in espresso? We talked to its creator, John Weiss" (2022)
- Barista Hustle — on WDT methods and commercial adoption
- Home-Barista — WDT history and evolution thread
- Needle gauges, prong counts and basket fits: the live Amazon listings for each tool, checked 2026-10-19
Keep reading
- Why your espresso channelsThe problem a WDT tool exists to solve, explained from the inside of the basket out.
- Puck screensThe other side of the puck, and a much weaker case. Read the evidence section before you buy one.
- Espresso tampers: get the size right firstThe step after WDT, and the accessory people most often buy in the wrong diameter.
- Pressurized vs non-pressurized basketsIf you are still on the dual-wall basket, this upgrade comes before the WDT tool.
- Bottomless portafiltersHow to actually see whether your distribution worked, rather than guessing.
- Coffee scalesStill the first accessory to buy. A WDT tool is the second or third.